1. Download the Feed The Beast Launcher
- Visit the Feed The Beast website here :
https://www.feed-the-beast.com/ - Click the 'Download Stable FTB Launcher' button
- If you're a Mac or Linux user click the text links
- The FTB Launcher will be saved to your download folder
- Create an 'FTB' folder, then move the downloaded file there
- Click to start the launcher
 Contact Support
2. Adding your Minecraft User to the FTB Launcher
- Find the drop-down menu at the bottom of the Launcher
- Select 'Create Profile' from the drop-down
- Enter your Minecraft Username/Email Address and Password
- Change the profile name
- Untick 'Remember Password' if you're using a public computer
- Click the 'Add' button
 What's next? >>
3. Launching a Modpack
- Click on the 'FTB MODPACKS' or 3RD PARTY PACKS tab
- Choose a modpack in the list on the left
- If you need to run an older (or) beta version of a Modpack, click on the drop-down at the top with 'Recommended' and select the version of the modpack you want
- Select your user profile using the drop-down at the bottom
- Click the 'Launch' button to install the modpack
- Once the FTB modpack is installed it will start automatically
4. Connecting to your FTB server
Once FTB Modpack has started:
- Click on 'Multiplayer'
- 'Click Add Server'
- Enter a name for your server in the 'Server name' box
- Enter your server details into the 'Server Address' box, this is in the format {IP Address}:{Port}, e.g. 255.255.255.255:25565
- Click 'Done', your server will be added to the list
- Double-click the server to join it
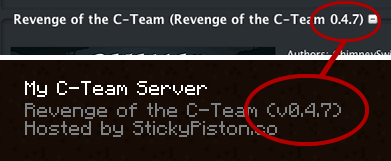
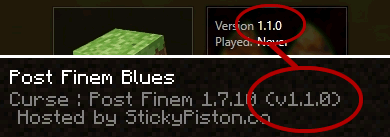
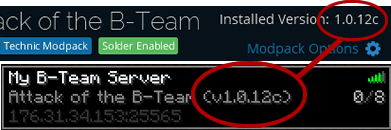
Hint : The number one reason for connection problems is when the modpack's server and launcher versions don't match, make sure the version number in the server list matches the one on the launcher. If not change the launcher version or contact support for a free server upgrade.
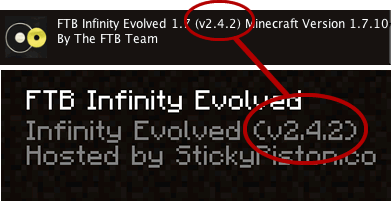
Make sure the modpack version in the launcher and server match, if they don't match you'll have a connection error when you join.
 It's all about the game, and the best Minecraft hosting experience you'll ever have. We offer Managed Minecraft Server Hosting, not a DIY service, message our support team about anything :) Try our famous server Instance Manager! (3 Servers for the price of 1!) Install instantly from a huge library of modpacks, vanilla & Spigot with plugin support.

 It's all about the game, and the best Minecraft hosting experience you'll ever have. We offer Managed Minecraft Server Hosting, not a DIY service, message our support team about anything :) Try our famous server Instance Manager! (3 Servers for the price of 1!) Install instantly from a huge library of modpacks, vanilla & Spigot with plugin support.